Friday, August 23, 2013

the science of color

We love playing with color! The kids adore mixing color tablets in their baths, seeing what happens when you melt crayons together, and mixing different colors of paints. We have done a few small color experiments in the past month and wanted to share them.

Experiment #1: Color Flowers

Materials Needed:
Small white flowers (carnations work best)
Glass containers
Food coloring
Water

We chose three different colors for this experiment. After filling each vase with water the kids squeezed in some food coloring. We then cut the flowers short, stuck them in the water, and waited. I couldn't find white carnations this time around, so I used a bouquet of small white roses instead. The blue color started showing up in the leaves and petals within the first day, the yellow took a bit longer to saturate, and the purple was hardly visible even after several days. We added more water as the level in the vases dropped, but not more food coloring. This was a great way to show kiddos how flowers 'drink' water.

Experiment #2: Paper Towel Color Mixing

Materials Needed:
Small bowls
Water
Food coloring
Paper towel

This super-easy experiment provides quick results and the kids like watching the color soak into the paper towel from different directions. We took one large paper towel and twisted it up like a rope. We then filled each small bowl with water and my daughter chose the colors to add in. We placed one end of the towel into each cup and voila! It was fun to ask Ali what she thought would happen to the water and the towel. She guessed that the water would be soaked up, but didn't think that the colors would mix in the middle. Initially she was correct, but after 30 minutes the colors did meet in the middle and make green.
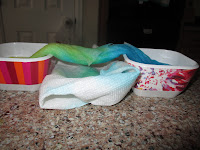
Yellow + Blue = Green
As the kids become more familiar with these little science projects, I want them to start a journal. Having them draw or write what they see, what they expect to happen, and what actually happened will give them valuable practice with the scientific method. As Adam Savage of Myth Busters stated, "The difference between screwing around and science is writing it down!". Wise words.

Sunday, August 4, 2013

art party: decorations

Our art birthday party was a success! It rarely rains on summer morning in Denver, but our party day was cold and drizzly so we had to move our art activities indoors. Luckily, we have a half-finished basement and the kids could go crazy with sand and paint without causing too much damage. I tend to rely on our large backyard for events since our living room and kitchen are pretty small, but we managed to find enough indoor seating for all of our guests. Even though it was a bit cozy, everyone had a good time celebrating with our five year old.
 
Balloon, globe, & pom-pom cluster:
Can you see our very large, wet dog enjoying the rain?
The beauty of this decoration is that it is simple to put together and makes a big impression. You can blow up the balloons the night before, since a little deflation won't look bad. I chose the hanging lights over our kitchen table for this cluster since it is a nice focal point. The globes came ready made, but the pom-poms were made by hand.

Pom-Pom Materials Needed:
Tissue paper
Floral wire
Heavy duty scissors
Ribbon

Stack approximately 6-10 layers of tissue paper on top of each other. Make accordion folds down the entire length of the tissue paper and wrap a short length of floral wire around the center of the stack; I prefer to use floral wire to ribbon because of the extra stiffness. You can cut the edges of the tissue paper to give your pom-pom a different look: a rounded edge makes it look wavy, while a triangle edge makes it look a bit sharper, and just leaving the edges straight looks more like a traditional pom. Slowly peel each layer of tissue paper up or down towards the center, until you have a three-dimensional shape. Attach a length of ribbon to the wire to hang the pom-pom, and gently shake or fluff the paper to make it look full.

The more sheets of tissue paper that are used, the more difficult it is to cut the edges and fluff the layers without them tearing. For the largest poms, use full-length tissue paper; cut the paper into smaller sections for medium or small poms. For more visually interesting poms, alternate the colors of tissue paper or use different colors on each half of the pom. I used 'happy birthday' tissue paper for some of the poms, and any seasonal paper could be used for the individual occasion. After tying the poms around the hanging kitchen lights, I added some curled lengths of ribbon. This was a fun, inexpensive party decoration to make. My little one is very excited to hang these decorations in her room when we finally take them off of the kitchen lights.

Thursday, July 25, 2013

art party: glitter bottles

Unshaken on the left, shaken on the right.
Nothing is more fun than a glitter bottle! We've made many different kinds over the years, but this type was one of the easiest and least expensive to create.

Materials Needed:
Clear plastic bottles with screw-on lids
Glitter glue (1 regular size tube per bottle)
Fine glitter
Water
Food coloring
Super glue

Once you have your materials ready, you can make these bottles very quickly. Start by squeezing an entire tube of glitter glue into each bottle; this is a good task for kids to practice eye-hand coordination and build fine motor strength. Fill the bottles halfway with water and add one or two drops of food coloring, followed by the fine glitter. Then fill up the rest of the bottle with water, leaving about a quarter inch of air at the top. We screwed on the lids and gave each bottle a good shake to make sure that we liked the coloration, and added more glitter or food coloring if necessary. Once they looked good, we used super glue on the inside of the lids and screwed them on tightly. Now our glitter bottles are ready to be party favors for this weekends art birthday party.


Friday, July 19, 2013

art party: paint chip banners

My oldest one is turning 5 years old at the end of the month and we are having an art party. Preparations have been going on for a while now, and I plan on posting the projects as we complete them and/or after the party. A few of the decorations have already gone up around the house, since it can be a long process and last-minute decorating isn't my thing. Here are the small paint chip banners we made.


Materials Needed:
Paint sample cards
Large paper punch
String
Clear tape

The most important step is to gather lots of paint sample cards from home improvement stores. We have been grabbing a handful every time we go to Lowes or Wal-Mart, and the kids love picking out a variety of fun colors. We used a large circle paper punch and were able to get two circles out of most of the paint cards. After we had a giant stack of circles, I measured out different lengths of string and taped circles to each one. I connected three strings of circles together before taping them up on all of the interior doors. I hung the banners high enough on the doors that the kids can't reach them, and reinforced them with enough tape that they won't be coming down without lots of work. I am glad to have a small part of the party planning completed, even if it is the easiest step!

Monday, July 15, 2013

ice cream in a bag

It has been a hot summer in Denver, and with the heat comes lots of extra time indoors to avoid the sun. My dad found a clever recipe for making your own ice cream and wanted to try it with the kids. The best part (besides getting ice cream) is that it requires lots of movement from the kids and wears them out!

Supplies needed:
2 tablespoons sugar
1 cup half and half
½ teaspoon vanilla extract (or other flavoring)
¼ cup rock salt
Ice
1 gallon-sized Ziploc bag
1 pint-sized Ziploc bag


Fill the gallon Ziploc bag halfway with ice and add in the rock salt. The salt decreases the temperature of the ice, making it cold enough to make ice cream quickly. Mix the sugar, half-and-half, and flavoring in the smaller bag and close it tightly. Bury the smaller bag inside of the ice in the larger bag, making sure it is completely surrounded; add more ice and rock salt if needed. Seal the large bag and wrap it in a towel, then let the kids go crazy jumping and shaking! The ice cream needs to be shaken for at least five minutes. This makes a good serving for two people, and should be eaten right away. My dad and sister enjoyed doing this project with the kids, and the kids really enjoyed the results.


Friday, June 21, 2013

colorful frames


Like most little ones, my kids love to make art. And, like most kiddos, they make too much of it for me to fit on the fridge. I've started scanning each piece of art that they make, and plan on making a large coffee table book with their masterpieces when enough has been collected. For their favorite pieces, though, I needed to create a special place for display.

Materials Needed:
Large paint-friendly frames (I got mine at Michaels)
Paint
Embellishments
Nails


I covered the frames with several coats of paint followed by a clear sealant coat. Using small embellishments, we added some sparkle to a few of the frames. I have seen frames with chicken wire or cork board attached on the back, but we put ours directly on the wall without backing. I am fine with using clear scotch tape to attach pictures to the frames and wall, but some people may prefer using the cork board to attach artwork. I used 4-6 small finish nails to attach the frames to the wall and the frames were quickly filled up by the kiddos. They are very proud of their 'art space' and point out their work to family and visitors alike.

Friday, June 14, 2013

handprint flower pots

Last year we made cute flower pots with kids hand-prints for Ali's preschool teachers. Since I am a preschool teacher and decorate our house as such,  I made a couple extra pots with just Ali & Grey's hand-prints for use around the house.


Materials Needed:
Large plastic pots
Acrylic paint
Clear sealant spray
Paint pens

I used plastic pots since they were less likely to shatter if they fell on the floor, and because they were already the colors that I wanted. Since both kids have sensory issues, painting their hands was a challenge. I spread the painting out over a week and tried to use mixing colors to my advantage. For example, I might start with yellow paint on one hand and red on the other, getting a hand-print with each; then have them rub their hands together to make orange. Most of Grey's hand-prints came out smudgy, which looked rather cute.

After all of the hand-prints were complete I used paint pens to write the kids names and the date on the pots. A quick round of spray sealant and the pots were ready to use. I have used one pot for plants, and the other as storage for loose items. This (relatively) quick & easy project still makes me smile everyday. I plan on making more projects with their hand-prints this summer. It is so easy to forget how little they once were, and I love these sweet & tiny reminders.


Tuesday, June 4, 2013

broken pots birdbath

What do you do when you accidentally break some of your Terra-cotta pots? Make them into a stacked pot birdbath!


Materials Needed:
Several Terra-cotta pots
Terra-cotta bowl
Terra-cotta dish 
Garden stake 
Spray Primer & Paint
Permanent adhesive


A few of my pots became stuck together and out of frustration I dropped them on the ground. Of course, they broke. Wanting to make lemonade out of my lemons, I primed the pieces and sprayed them different colors. After they dried I glued the pieces back together using Quick Grip all-purpose permanent adhesive. This glue does dry quickly and becomes clear, but had a lot of air bubbles that I had to smooth out. I liked that the glue is water- and weather-proof, as the project will stay outdoors year-round. After the glue dried I traced the cracks with a silver paint pen. Why not accentuate what makes these pots unique, right?

I found a few more pots of varying sizes which were already painted, and then prepped a terra cotta bowl and a small dish. I pounded a five foot garden stake about 18 inches into the ground and stacked the first three pots upside down. I glued on the last pot upright to give it extra support. Then I glued on the large bowl to be filled with water, and the small dish for bird food. The kids were excited to see the finished product and we are hoping for lots of cute little birdie visitors.


Saturday, June 1, 2013

the wedding tree

I got to try a brand new painting project last week. Some friends of my dad's had a lovely mountain wedding ceremony, which my dad officiated. I have seen versions of this wedding tree around on-line and really wanted to give it a try. The cute part of this tree is that the wedding guests make the leaves with their fingerprints. In this case the couple's wedding colors were maroon and yellow, which made for a lovely autumn tree.

Materials Needed:
Canvas
Paints & Brushes
Alphabet Stickers


I made the background with several colors of cream and brown, with a final coat of pearlescent clear paint for the shiny effect. For the tree I used a darker brown, finishing with cream and gold highlights. I placed hearts and spelled out the names of the bride and groom with stickers, then painted the grassy knoll using greens and yellows. After the paint dried, it was just a matter of peeling off the stickers to reveal the hearts and names. The painting was finally done when the wedding guests placed their fingerprints on the tree. I was told that the painting was a hit, and I hope that I can do it again for other weddings.


Tuesday, May 28, 2013

cement square hopscotch

 
Last summer we collected 16 concrete squares in our dog run. I wanted to use them as some kind of decoration, but just putting them out in the pea gravel in rows was boring. So, this summer we made them into a hopscotch!

Materials Needed:
Concrete squares
Spray paint & primer
Spray sealant
Outdoor puff paint
Stencils

I tried spray painting a few of the squares without first priming them, which was a mistake. The paint seeped into the cement and the color was terrible. After priming each square, I coated the squares several times with spray paint. We had some special glitter spray paint on hand, so a few of the squares were extra sparkly.

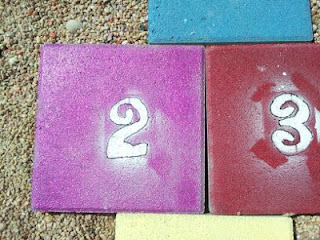
After the paint was dry, I taped on number stencils and sprayed the numbers white. Alisen decided which number would go on each color. Obviously, I didn't do a great job of taping around the stencils, as there is a lot of extra white paint outside of the stencil areas:
 
I let the stones dry overnight, and the next morning traced the numbers with a bottle of black outdoor puff paint. This paint was easy to apply in the squeeze bottle and didn't stick up too far off of the cement. Once again I waited overnight, and then finished the squares by coating them with a clear spray sealant. 

We arranged the stones in order from 1-15, with an extra white square being the 'starting line'. This is a project that can easily be extended as far as we want; we might end up with 25+ squares before the kids get bored with the hopscotch. I like that it encourages the kids to use math skills & turn-taking while being active. An added bonus was the colored pea gravel we ended up with, since we had spray painted all of the squares on top of the gravel without a tarp.

Although this project took several days, it was easy and fairly cheap. The kids were excited to help, and they are very proud of their unique game.

Sunday, May 26, 2013

tipsy pots

I loved making this project! I initially saw this idea on Pinterest, but cannot find the original link. If it turns up I will add it to give appropriate credit to the creative person who came up with this idea.

Materials Needed:
Spray paint & spray primer
5 foot of metal rebar
5-8 terra cotta pots (depending on size)
Dirt & flowers


I started out by spraying the terra cotta pots with spray paint, and quickly learned that primer was going to be a necessity. Some spray paints have primer added in, but it is harder to find. So, after re-spraying the pots with primer it was time to pick the colors! I don't use a lot of red inside our house, but the patio umbrella outside is bright red, so I was happy to use some bright warm colors on the pots.

After pounding the rebar into the ground about a foot, I placed the short, squat pot over the rebar and slid it down until it hit the ground. I had to fill up this pot with dirt in order to prop the next pot on top. After that it was simply a matter of sliding each pot on and angling it, then we added some dirt and flowers to finish the project. I was able to fit a small sprig of ivy in the bottom-most pot of the red tower, and am hoping that it will wrap around upwards as it grows.

The kids enjoy watching the water trickle down from the top pot when we water. The pots have had no trouble withstanding our constant breeze and have gone through a few giant wind gusts unscathed. Sturdy and eye-catching, this was a great project to celebrate the arrival of summer weather.